
 by
by Old computers are mostly used to take backups and store our memories. Such backup files can accumulate a lot of duplicates. It is difficult to find duplicate photos manually. If you have fewer folders to manage, you can try the manual methods. If there are a lot of albums to manage, you can make use of the Best Duplicate Photo Finder & Remover for Windows. Before we go ahead and find duplicate photos, we should understand the root cause of duplicate photos.
Contents
How Duplicate Photos are Created?
There are several reasons behind duplicate photos in our storage device. Clicking multiple selfies or capturing photos in burst mode is the main reason for accumulating duplicate photos on a smartphone. Without removing duplicate photos from the smartphone, taking a backup of the smartphone storage is the next big reason for having duplicate photos.
There are times when we click on the download button repeatedly and download the same photos again and again. If you sync the same cloud account on different devices, you will have the same duplicates on all the devices. Taking a backup and restoring the backup files repeatedly will also create a lot of duplicate photos and other media files on your PC.
Check for Duplicates Using Windows Explorer
Windows Explorer is the default file explorer where you can check for duplicate photos manually. It is a time taking exercise and may not bring up accuracy but you can check a few folders without installing any duplicate photo cleaner.
Step 1. Access Windows Explorer (Win + I) on your PC.
Step 2. Go to the Pictures folder and access the album that needs to be checked.
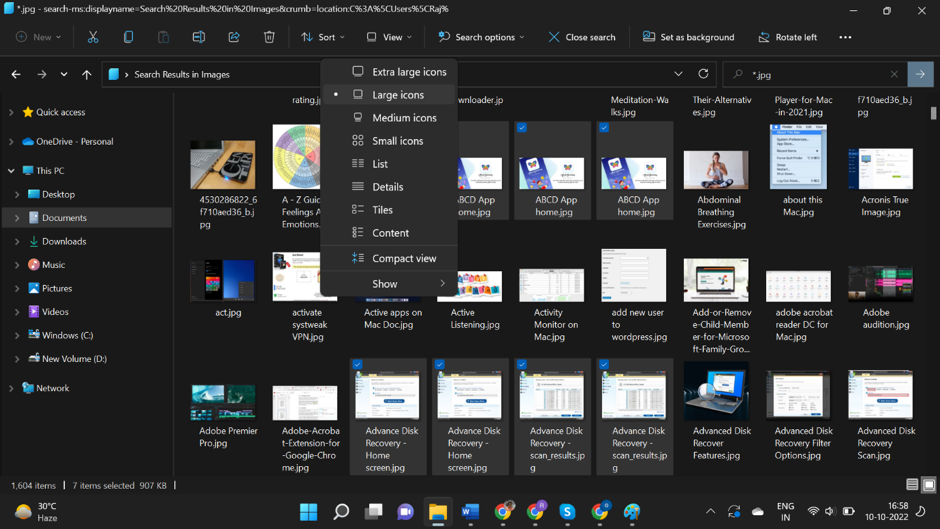
Step 3. Select the Extra Large Icons option from the Layout section in the View menu.
Step 4. You will find thumbnails of all the images stored in the folder.
Step 5. Hold down the Ctrl key and click on the duplicate images that you come across. Once selected, hit the Delete key to send all the selected duplicate photos to the Recycle Bin. This is how to delete duplicate photos without using the software.
Upload Photos on Google Photos
Google Photos has a special feature to automatically find and eliminate uploading duplicate photos in a single album. It only uploads unique photos in a single album. If there are duplicate photos, they will be excluded from the upload.
Step 1. Access your browser and sign in to your Google account.
Step 2. Go to the Google Photos app from the Google apps menu (9 dots).

Step 3. Click on the Upload button on the top right to browse photos from your computer.
Step 4. It will scan all the images and will avoid exact duplicates to be uploaded to the same album. The only drawback is it will only exclude the exact duplicates. Similar, edited, or cropped duplicate photos will still be uploaded.
Delete Duplicate Photos Using Photos Viewer
If the above trick is not working for you, and you have a few albums to check, it is better you explore all the photos using the Photos Viewer application. This is the default photo explorer app of the Windows operating system.
Step 1. Access Windows Explorer (Win + I) on your PC.
Step 2. Go to the Pictures folder and access the album that needs to be checked.
Step 3. Double-click on the first picture and it will open up in the Photos Viewer app.

Step 4. Use the right and left arrow keys to move next or previous. As you come across a duplicate photo, you can press the delete key to remove duplicate photos. Do the same with all the found duplicates that come your way.
Use Duplicate Photos Fixer Pro
The best duplicate photo finder app for Windows is the best solution to quickly find duplicate photos and delete them from your computer. There are dozens of duplicate photo finders available however not all of them are effective enough.
Duplicate Photos Fixer Pro is one of the best duplicate photo finders that we can use in 2023. It is a lightweight application yet effective enough to find all the duplicate photos stored on a storage device. It shares excellent compatibility with all the latest versions of the Windows operating system and other OS like MacOS, Android, and iOS.
Duplicate Photos Fixer Pro can run a quick and deep scan on internal HDD, SSD, SD card, USB Drive, and all other storage drives that connect to PC. The process to find duplicate photos is just a few clicks away.
Step 1. Download and install Duplicate Photos Fixer Pro from its official website.
Step 2. Activate the product with the license key received in your email.
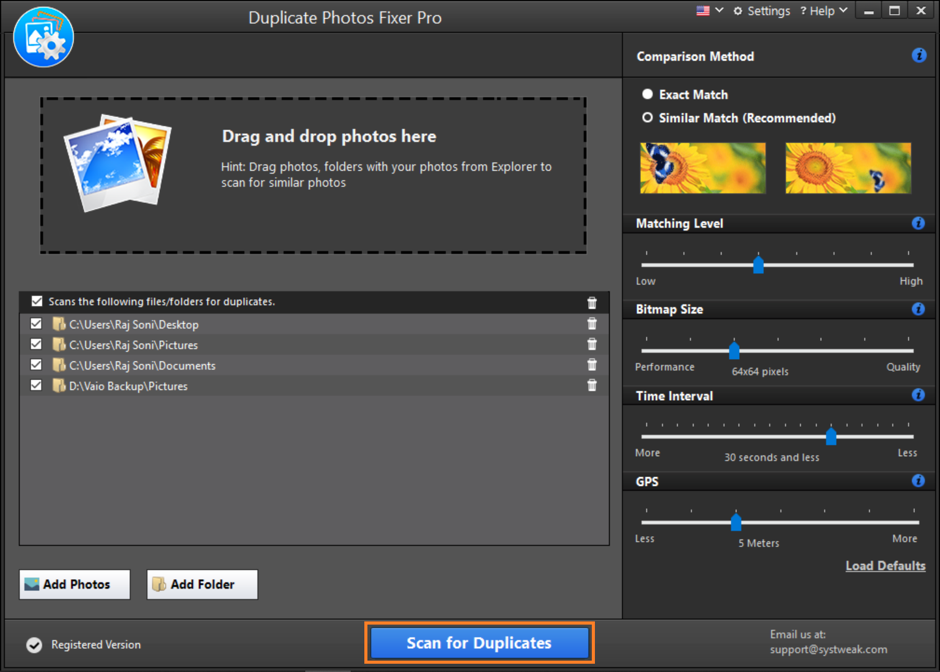
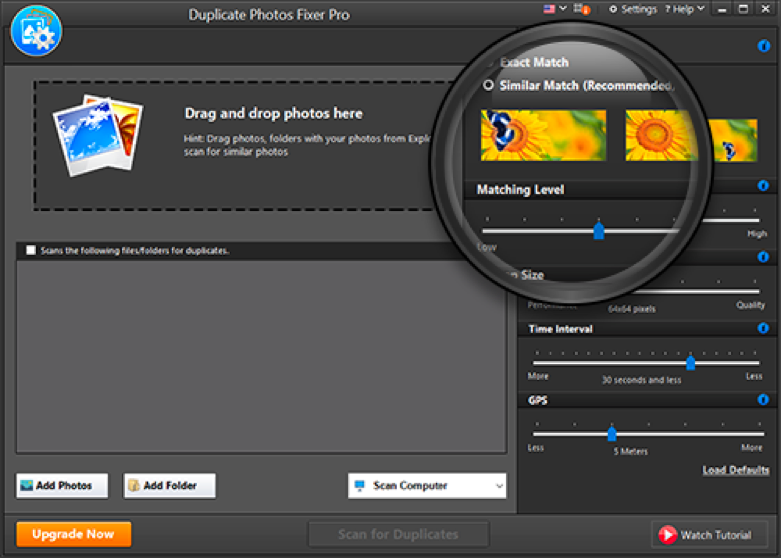
Step 3. Enter the console and configure the settings on how you wish to scan for duplicate photos.
Step 4. Select the storage device to scan and the scan mode (Quick Scan/Deep Scan).
Step 5. Hit the Scan ‘Scan for Duplicates’ button and it will find duplicate photos on the selected storage device.
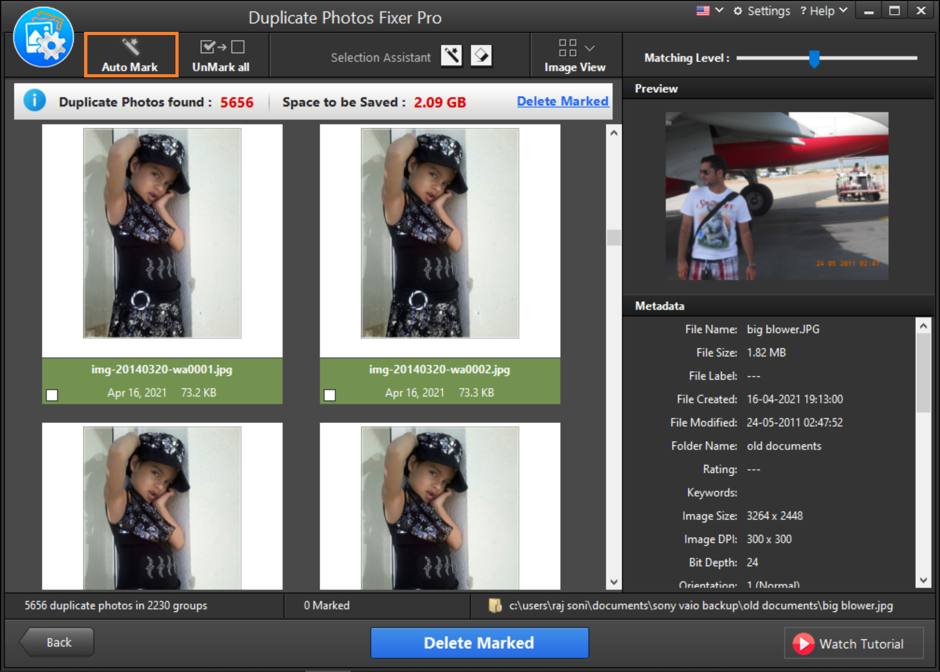
Step 6. Select found duplicates manually or click on the Auto-Mark button on the top left to automatically select all the found duplicates.
Step 7. Click on the Delete marked button to remove duplicate photos from your storage. You can also scan cloud storage drives like Google Drive or Dropbox directly using this console.
Final Words
This article on how to find and delete similar photographs from an old computer has all the manual methods and automated methods to quickly find and remove duplicate photos. You can follow the step-by-step process on how to delete duplicate photos. If you are struggling with multiple photo albums, you can use the best duplicate photo finder for Windows to quickly find duplicate photos and automatically delete duplicate photos from any storage device.